- +92 304 7398 863
- info@mutenterprises.com.pk
- 24/7 Whatsapp Support
How to Create WooCommerce Coupons

In the competitive landscape of e-commerce, offering discounts and promotions is a powerful strategy for attracting customers and driving sales. WooCommerce, with its robust feature set, enables store owners to create and manage coupons effortlessly. Coupons serve as a valuable tool for incentivizing purchases, rewarding loyal customers, and boosting overall revenue. In this guide, we’ll walk you through the step-by-step process of adding coupons in WooCommerce, empowering you to implement effective discount strategies and enhance the shopping experience for your customers.
 3. Adding a New Coupon
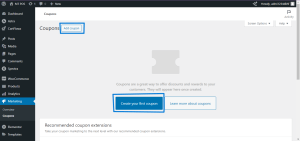
On the Coupons page, click on the “Add Coupon” button to create a new coupon.
 4. Configuring Coupon Details:
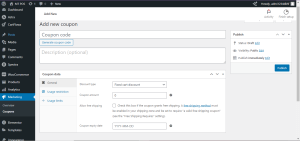
Fill in the required details for your coupon:
– Coupon code: Enter a unique code that customers will use to redeem the coupon during checkout.
– Description: Provide a brief description of the coupon for internal reference.
– Discount Type: Choose the type of discount you want to offer (e.g., percentage discount, fixed cart discount, fixed product discount, etc.).
– Coupon Amount: Set the discount amount or percentage.
– Usage Restriction: Optionally, configure usage restrictions such as minimum and maximum spend. The Usage limits per user, and restrictions based on products or product categories.
– Usage Limits: Specify usage limits for the coupon. Such as the maximum number of times it can be used overall or per customer.
– Usage Expiry: Set an expiry date for the coupon if desired.
 5. Publishing the Coupon:
After configuring coupon details, click on the “Publish” button to make your coupon active.
6. Testing the Coupon:
It’s a good practice to test the coupon to ensure it works as expected. Add products to the cart on your website, proceed to checkout, and enter the coupon code to verify that the discount is applied correctly.
Understanding Coupons in WooCommerce:
Coupons in WooCommerce are promotional codes that customers can apply during checkout to receive discounts, free shipping, or other special offers. These coupons can be configured with various conditions and restrictions, allowing store owners to tailor promotions to specific customer segments, products, or purchase behaviors.Step-by-Step Guide to Adding Coupons:
1. Accessing the WordPress Dashboard: Begin by logging into the WordPress dashboard of your WooCommerce-powered website. 2. Navigating to the Coupons Section: Once logged in, locate the “WooCommerce” tab on the left-hand side menu and hover over it. From the submenu options, click on “Coupons.” 3. Adding a New Coupon
On the Coupons page, click on the “Add Coupon” button to create a new coupon.
 4. Configuring Coupon Details:
Fill in the required details for your coupon:
– Coupon code: Enter a unique code that customers will use to redeem the coupon during checkout.
– Description: Provide a brief description of the coupon for internal reference.
– Discount Type: Choose the type of discount you want to offer (e.g., percentage discount, fixed cart discount, fixed product discount, etc.).
– Coupon Amount: Set the discount amount or percentage.
– Usage Restriction: Optionally, configure usage restrictions such as minimum and maximum spend. The Usage limits per user, and restrictions based on products or product categories.
– Usage Limits: Specify usage limits for the coupon. Such as the maximum number of times it can be used overall or per customer.
– Usage Expiry: Set an expiry date for the coupon if desired.
 5. Publishing the Coupon:
After configuring coupon details, click on the “Publish” button to make your coupon active.
6. Testing the Coupon:
It’s a good practice to test the coupon to ensure it works as expected. Add products to the cart on your website, proceed to checkout, and enter the coupon code to verify that the discount is applied correctly.
