

In the bustling world of online commerce, simplicity often reigns supreme. WooCommerce, the powerful WordPress plugin, empowers businesses to effortlessly set up and manage their online stores. At the heart of every e-commerce venture lies the need to add products efficiently. In this guide, we’ll walk you through the step-by-step process of adding simple products in WooCommerce, helping you streamline your online selling experience.


Understanding Simple Products:
Before diving into the process, let’s grasp the concept of simple products. In WooCommerce, a simple product is a standalone item with no variations in size, color, or other attributes. Examples include individual items like books, electronics, or clothing items that don’t come in different options.Step-by-Step Guide to Adding Simple Products:
1. Accessing the WordPress Dashboard:
Start by logging into the WordPress dashboard of your WooCommerce-powered website.2. Navigating to the Products Section:
Once logged in, locate the “Products” tab on the left-hand side menu and hover over it. From the submenu options, click on “Add Product.”
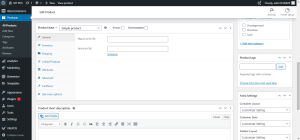
3. Entering Product Details:
You’ll now be directed to the “Add New Product” page. Begin by entering the following details: – Product Name: Provide a descriptive name for your product. – Product Description: Here, Add a detailed description of the product. Highlighting its features, benefits, and any other relevant information. – Product Categories: Assign the product to one or more categories to organize it within your store. – Product Tags: Optionally, add tags to help customers find the product through search.
4. Setting Product Data:
Scroll down to the “Product Data” meta box. Here, choose “Simple product” from the dropdown menu. – Regular Price: Enter the price of the product. – Sale Price (Optional): If the product is on sale, enter the discounted price. – Tax Status and Tax Class: Set tax-related options based on your business requirements. – Inventory Management: Manage stock by entering the stock quantity and enabling stock management if necessary.
5. Product Short Description (Optional):
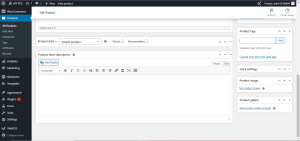
Below the product data section, you’ll find a field for adding a short description. This concise description is often displayed alongside the product on shop pages.6. Adding Product Images:
Click on the “Set product image” link to upload or select images that showcase your product. You can also add additional images to provide different views or angles of the product.