

In today’s digital landscape, security is paramount for websites to protect sensitive data and establish trust with visitors. One essential security measure is the installation of an SSL (Secure Sockets Layer) certificate, which encrypts data transmitted between a web server and a user’s browser. Fortunately, cPanel provides a straightforward process for installing SSL certificates, ensuring that your website is safeguarded against unauthorized access and data breaches. In this article, we’ll walk you through the steps to install an SSL certificate in cPanel, empowering you to enhance the security of your website.

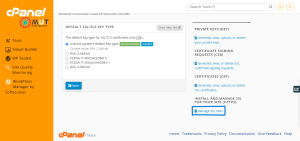
Step 1: Accessing the SSL/TLS Manager in cPanel
To begin the installation process, log in to your cPanel account using your credentials. Once logged in, navigate to the “Security” section and click on the “SSL/TLS Manager” option. This will take you to the SSL/TLS Manager interface, where you can manage SSL certificates for your domains.

Step 2: Generating a CSR
Before installing an SSL certificate, you’ll need to generate a Certificate Signing Request (CSR). In the SSL/TLS Manager interface, click on the “Generate, view, upload, or delete SSL certificates” option. Then, select the “Generate a New Certificate Signing Request (CSR)” option and fill in the required information, including the domain name, organization details, and contact email address. Click on the “Generate” button to create the Certificate Signing Request.
Step 3: Ordering an SSL Certificate
With the CSR generated, you can now order an SSL certificate from a trusted Certificate Authority (CA). There are several reputable CAs that offer SSL certificates, including Let’s Encrypt, Sectigo, and DigiCert. Follow the instructions provided by your chosen CA to order an SSL certificate for your domain. You’ll typically need to submit the CSR generated in the previous step and complete any verification steps required by the CA.
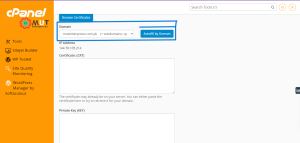
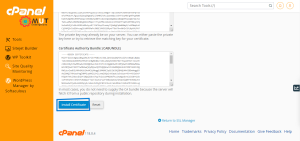
Step 4: Uploading and Installing the SSL Certificate
Once you’ve obtained the SSL certificate from the CA, return to the SSL/TLS Manager interface in cPanel. Click on the “Manage SSL” option and scroll down to the “Install an SSL Certificate” section. Here, you can paste the SSL certificate, private key, and CA bundle (if applicable) into the corresponding fields. Click on the “Install Certificate” button to complete the installation process.
Step 5: Verifying SSL Certificate Installation
After installing the SSL certificate, it’s essential to verify that the installation was successful. You can do this by visiting your website using https:// in the URL. Most web browsers will display a padlock icon in the address bar to indicate that the connection is secure. You can also use online SSL checker tools to confirm that the SSL certificate is installed correctly and valid.
Conclusion:
Installing an SSL certificate in cPanel is a crucial step in securing your website and protecting sensitive data. By following the steps outlined in this guide, you can easily generate a CSR, order an SSL certificate, and install it in cPanel, ensuring that your website benefits from encrypted communication and enhanced security. Take proactive measures to safeguard your website and build trust with your visitors by implementing SSL encryption today.